docker 实现应用的容器化 consul 集群实现服务的注册、发现 traefik 处理外部流量的负载均衡与路由
启动 consul 集群与 docker
通过 vagrant 起三台虚拟机实现基本的 consul 集群环境(为了节约资源把 docker 也运行在这上面了)。 consul 的 vagrant 配置文件如下:
# -*- mode: ruby -*-
# vi: set ft=ruby :

# All Vagrant configuration is done below. The "2" in Vagrant.configure
# configures the configuration version (we support older styles for
# backwards compatibility). Please don't change it unless you know what
# you're doing.
Vagrant.configure("2") do |config|

$script = <<SCRIPT

echo "Installing"

yum install -y wget
wget -O /etc/yum.repos.d/CentOS-Base.repo http://mirrors.aliyun.com/repo/Centos-7.repo
wget -O /etc/yum.repos.d/epel.repo http://mirrors.aliyun.com/repo/epel-7.repo
yum clean all
yum makecache

yum install -y jq unzip vim wget net-tools bind-utils dnsmasq

sudo cp /vagrant/consul /usr/bin/consul

echo "Installing docker.."
sudo yum install -y yum-utils device-mapper-persistent-data lvm2
sudo yum-config-manager --add-repo http://mirrors.aliyun.com/docker-ce/linux/centos/docker-ce.repo
sudo yum install -y docker-ce docker-ce-cli containerd.io
sudo systemctl start docker

echo "success"

SCRIPT
  # The most common configuration options are documented and commented below.
  # For a complete reference, please see the online documentation at
  # https://docs.vagrantup.com.

  # Every Vagrant development environment requires a box. You can search for
  # boxes at https://vagrantcloud.com/search.
  config.vm.box = "centos/7"
  config.vm.provision "shell", inline: $script

  config.vm.define "node1" do |node1|
    node1.vm.hostname = "node1"
    node1.vm.network "private_network", ip: "172.17.17.11"

  end

  config.vm.define "node2" do |node2|
    node2.vm.hostname = "node2"
    node2.vm.network "private_network", ip: "172.17.17.12"
  end

  config.vm.define "node3" do |node3|
    node3.vm.hostname = "node3"
    node3.vm.network "private_network", ip: "172.17.17.13"
  end
  # Disable automatic box update checking. If you disable this, then
  # boxes will only be checked for updates when the user runs
  # `vagrant box outdated`. This is not recommended.
  config.vm.box_check_update = false

  # Create a forwarded port mapping which allows access to a specific port
  # within the machine from a port on the host machine. In the example below,
  # accessing "localhost:8080" will access port 80 on the guest machine.
  # NOTE: This will enable public access to the opened port
  # config.vm.network "forwarded_port", guest: 80, host: 8080

  # Create a forwarded port mapping which allows access to a specific port
  # within the machine from a port on the host machine and only allow access
  # via 127.0.0.1 to disable public access
  # config.vm.network "forwarded_port", guest: 80, host: 8080, host_ip: "127.0.0.1"

  # Create a private network, which allows host-only access to the machine
  # using a specific IP.
  # config.vm.network "private_network", ip: "192.168.33.10"

  # Create a public network, which generally matched to bridged network.
  # Bridged networks make the machine appear as another physical device on
  # your network.
  # config.vm.network "public_network"

  # Share an additional folder to the guest VM. The first argument is
  # the path on the host to the actual folder. The second argument is
  # the path on the guest to mount the folder. And the optional third
  # argument is a set of non-required options.
  # config.vm.synced_folder "../data", "/vagrant_data"

  # Provider-specific configuration so you can fine-tune various
  # backing providers for Vagrant. These expose provider-specific options.
  # Example for VirtualBox:
  #
   config.vm.provider "virtualbox" do |vb|
  #   # Display the VirtualBox GUI when booting the machine
  #   vb.gui = true
  #
  #   # Customize the amount of memory on the VM:
     vb.memory = "1024"
   end
  #
  # View the documentation for the provider you are using for more
  # information on available options.

  # Enable provisioning with a shell script. Additional provisioners such as
  # Puppet, Chef, Ansible, Salt, and Docker are also available. Please see the
  # documentation for more information about their specific syntax and use.
  # config.vm.provision "shell", inline: <<-SHELL
  #   apt-get update
  #   apt-get install -y apache2
  # SHELL
end
为了节省时间我直接下载好了 consul 的可执行文件放到了 vagrant 配置文件同目录下,vagrant 会把当前目录下的文件都复制进虚拟机的 /vagrant 目录下,还有三个节点的 consul 配置文件。
node1
{
    "datacenter":"dc1",
    "primary_datacenter":"dc1",
    "bootstrap_expect":3,
    "advertise_addr": "172.17.17.11",
    "bind_addr": "172.17.17.11",
    "client_addr":"0.0.0.0",
    "server":true,
    "node_name":"node1",
    "ui":true,
    "data_dir":"/opt/consul",
    "enable_script_checks":true,
    "enable_local_script_checks":true,
    "log_file":"/opt/consul/",
    "log_level":"info",
    "log_rotate_duration":"24h"
}
node2
{
    "datacenter":"dc1",
    "primary_datacenter":"dc1",
    "advertise_addr": "172.17.17.12",
    "bind_addr": "172.17.17.12",
    "client_addr":"0.0.0.0",
    "server":true,
    "node_name":"node2",
    "ui":true,
    "data_dir":"/opt/consul",
    "enable_script_checks":true,
    "enable_local_script_checks":true,
    "log_file":"/opt/consul/",
    "log_level":"info",
    "log_rotate_duration":"24h",
    "start_join":[
        "172.17.17.11"
    ],
    "retry_join":[
        "172.17.17.11"
    ]
}
node3
{
    "datacenter":"dc1",
    "primary_datacenter":"dc1",
    "advertise_addr": "172.17.17.13",
    "bind_addr": "172.17.17.13",
    "client_addr":"0.0.0.0",
    "server":true,
    "node_name":"node3",
    "ui":true,
    "data_dir":"/opt/consul",
    "enable_script_checks":true,
    "enable_local_script_checks":true,
    "log_file":"/opt/consul/",
    "log_level":"info",
    "log_rotate_duration":"24h",
    "start_join":[
        "172.17.17.11"
    ],
    "retry_join":[
        "172.17.17.11"
    ]

}
三个节点分别是
- node1 172.17.17.11
- node2 172.17.17.12
- node3 172.17.17.13
运行 vagrant up --provider=virtualbox 把三个节点启动。
分别进入三个节点先 sudo su - 切换成 root 用户,然后把 consul 起来,再 exit 退出就会后台运行了。
[root@node1 ~]# consul agent -config-file /vagrant/node1.json &
[root@node2 ~]# consul agent -config-file /vagrant/node2.json &
[root@node3 ~]# consul agent -config-file /vagrant/node3.json &
在三个节点上分别通过 docker 运行 web 服务,对外端口是 32768
[root@node1 ~]# docker run -d -p 32768:80 --name test containous/whoami
服务注册
在三个节点上分别把刚才的 web 服务注册到 consul,这一步在实际项目中可以写到 docker image build 中,然后在容器启动的时候就注册到 consul。
[root@node1 ~]# curl --request PUT --data @web.json http://127.0.0.1:8500/v1/agent/service/register?replace-existing-checks=true
web.json 内容如下
{
  "ID": "web",
  "Name": "consul_web",
  "Tags": [
    "whoami"
  ],
  "Check": {
    "Args": ["curl", "172.17.17.11:32768"],
    "Interval": "10s",
    "Timeout": "3s"
  },
  "Address": "172.17.17.11",
  "Port": 32768
}
其中增加了简单的健康检查, ip 部分每个节点修改成自己的。
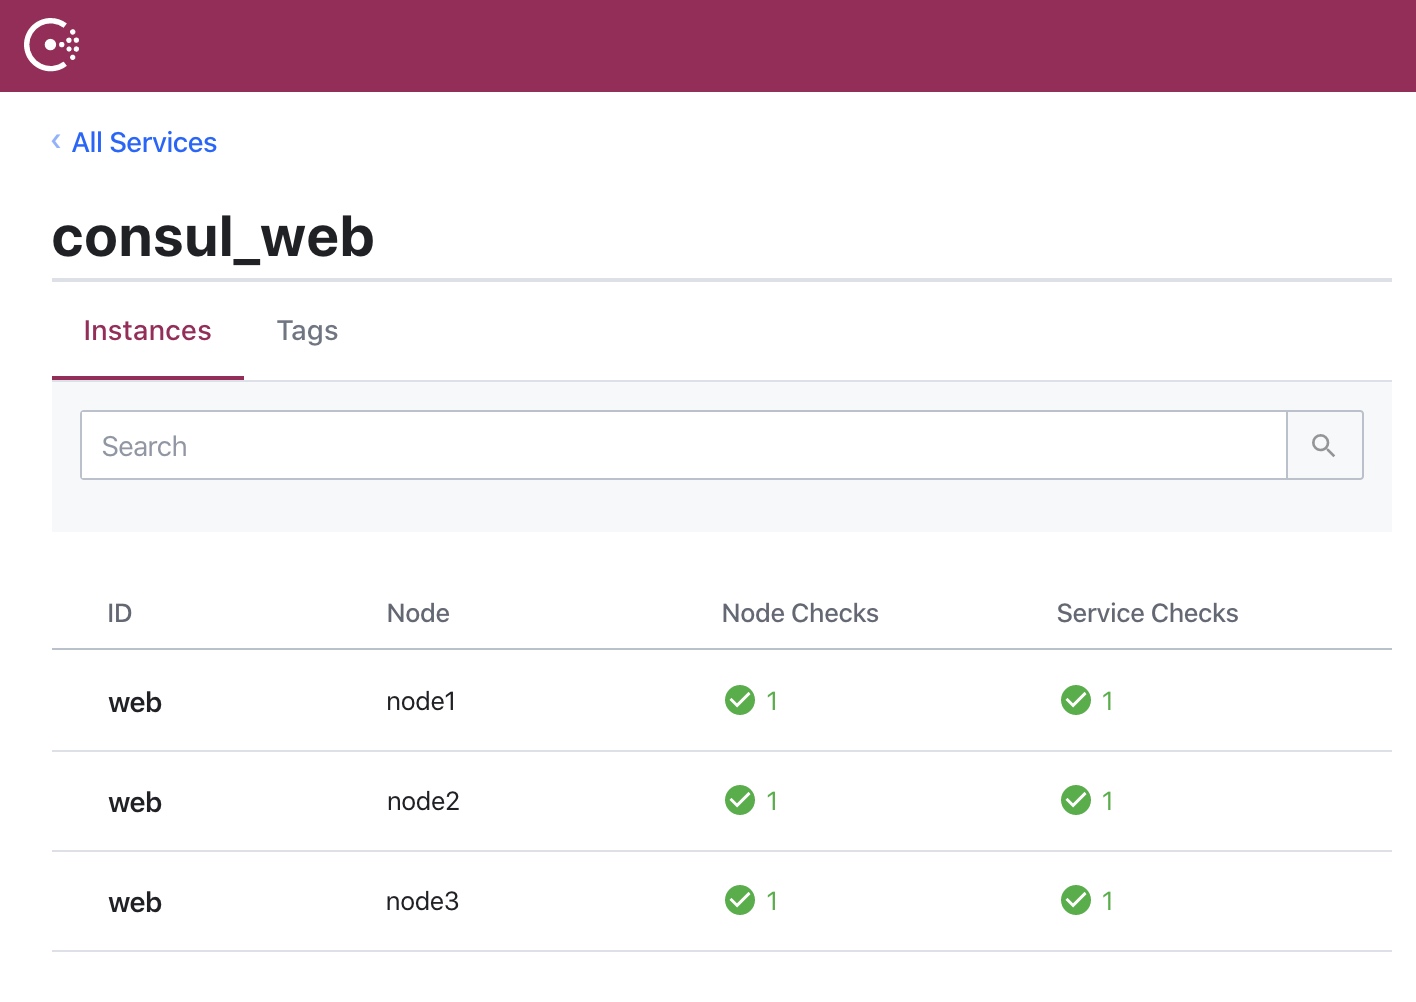
现在通过访问 http://172.17.17.11:8500/ 可以看到如下的信息
随便找一个节点通过 consul 自带的 dns 查询下服务,可以看到返回了所有健康的服务节点。
[root@node1 ~]# dig @127.0.0.1 -p 8600 consul_web.service.consul

; <<>> DiG 9.11.4-P2-RedHat-9.11.4-9.P2.el7 <<>> @127.0.0.1 -p 8600 consul_web.service.consul
; (1 server found)
;; global options: +cmd
;; Got answer:
;; ->>HEADER<<- opcode: QUERY, status: NOERROR, id: 11034
;; flags: qr aa rd; QUERY: 1, ANSWER: 3, AUTHORITY: 0, ADDITIONAL: 4
;; WARNING: recursion requested but not available

;; OPT PSEUDOSECTION:
; EDNS: version: 0, flags:; udp: 4096
;; QUESTION SECTION:
;consul_web.service.consul.	IN	A

;; ANSWER SECTION:
consul_web.service.consul. 0	IN	A	172.17.17.11
consul_web.service.consul. 0	IN	A	172.17.17.13
consul_web.service.consul. 0	IN	A	172.17.17.12

;; ADDITIONAL SECTION:
consul_web.service.consul. 0	IN	TXT	"consul-network-segment="
consul_web.service.consul. 0	IN	TXT	"consul-network-segment="
consul_web.service.consul. 0	IN	TXT	"consul-network-segment="

;; Query time: 0 msec
;; SERVER: 127.0.0.1#8600(127.0.0.1)
;; WHEN: Thu Feb 06 13:10:12 UTC 2020
;; MSG SIZE  rcvd: 210
服务发现 dns
通过 dnsmasq 将节点的 dns 修改为 consul 的,先创建配置文件 /etc/dnsmasq.d/10-consul 内容为
server=/consul/127.0.0.1#8600
server=223.5.5.5
然后运行 systemctl start dnsmasq 启动 dnsmasq,再把 /etc/resolv.conf dns 服务器地址改成 127.0.0.1。
通过 curl 访问
[root@node1 ~]# curl http://consul_web.service.consul:32768 -i
HTTP/1.1 200 OK
Date: Thu, 06 Feb 2020 13:19:43 GMT
Content-Length: 178
Content-Type: text/plain; charset=utf-8

Hostname: 2cc06cae3b6e
IP: 127.0.0.1
IP: 172.18.0.2
RemoteAddr: 172.17.17.11:54108
GET / HTTP/1.1
Host: consul_web.service.consul:32768
User-Agent: curl/7.29.0
Accept: */*
把 docker 中 dns 配置修改为当前节点的,配置文件 /etc/docker/daemon.json
{
    "dns": ["172.17.17.11"],
    "dns-search": ["service.consul"],
}
这样在 docker 容器内部就可以通过 consul 的 dns 来进行服务发现了。现在服务的注册与内部的服务发现都已经完成了。
traefik
对于外部流量的进入与路由使用 Traefik 来管理。
起一台跑 traefik 的 vagrant 配置文件如下,同样下载了 traefik 的可执行文件到当前目录。
# -*- mode: ruby -*-
# vi: set ft=ruby :

# All Vagrant configuration is done below. The "2" in Vagrant.configure
# configures the configuration version (we support older styles for
# backwards compatibility). Please don't change it unless you know what
# you're doing.
Vagrant.configure("2") do |config|

$script = <<SCRIPT

yum install -y wget
wget -O /etc/yum.repos.d/CentOS-Base.repo http://mirrors.aliyun.com/repo/Centos-7.repo
wget -O /etc/yum.repos.d/epel.repo http://mirrors.aliyun.com/repo/epel-7.repo
yum clean all
yum makecache

yum install -y jq unzip vim wget net-tools bind-utils dnsmasq

sudo cp /vagrant/consul /usr/bin/consul
sudo cp /vagrant/traefik /usr/bin/traefik

echo "success"

SCRIPT
  # The most common configuration options are documented and commented below.
  # For a complete reference, please see the online documentation at
  # https://docs.vagrantup.com.

  # Every Vagrant development environment requires a box. You can search for
  # boxes at https://vagrantcloud.com/search.
  config.vm.box = "centos/7"
  config.vm.provision "shell", inline: $script

  config.vm.define "traefik" do |traefik|
      traefik.vm.hostname = "traefik"
      traefik.vm.network "private_network", ip: "172.17.17.21"
  end

  # Disable automatic box update checking. If you disable this, then
  # boxes will only be checked for updates when the user runs
  # `vagrant box outdated`. This is not recommended.
  config.vm.box_check_update = false

  # Create a forwarded port mapping which allows access to a specific port
  # within the machine from a port on the host machine. In the example below,
  # accessing "localhost:8080" will access port 80 on the guest machine.
  # NOTE: This will enable public access to the opened port
  # config.vm.network "forwarded_port", guest: 80, host: 8080

  # Create a forwarded port mapping which allows access to a specific port
  # within the machine from a port on the host machine and only allow access
  # via 127.0.0.1 to disable public access
  # config.vm.network "forwarded_port", guest: 80, host: 8080, host_ip: "127.0.0.1"

  # Create a private network, which allows host-only access to the machine
  # using a specific IP.
  # config.vm.network "private_network", ip: "192.168.33.10"

  # Create a public network, which generally matched to bridged network.
  # Bridged networks make the machine appear as another physical device on
  # your network.
  # config.vm.network "public_network"

  # Share an additional folder to the guest VM. The first argument is
  # the path on the host to the actual folder. The second argument is
  # the path on the guest to mount the folder. And the optional third
  # argument is a set of non-required options.
  # config.vm.synced_folder "../data", "/vagrant_data"

  # Provider-specific configuration so you can fine-tune various
  # backing providers for Vagrant. These expose provider-specific options.
  # Example for VirtualBox:
  #
   config.vm.provider "virtualbox" do |vb|
  #   # Display the VirtualBox GUI when booting the machine
  #   vb.gui = true
  #
  #   # Customize the amount of memory on the VM:
     vb.memory = "1024"
   end
  #
  # View the documentation for the provider you are using for more
  # information on available options.

  # Enable provisioning with a shell script. Additional provisioners such as
  # Puppet, Chef, Ansible, Salt, and Docker are also available. Please see the
  # documentation for more information about their specific syntax and use.
  # config.vm.provision "shell", inline: <<-SHELL
  #   apt-get update
  #   apt-get install -y apache2
  # SHELL
end
节点为
- traefik 172.17.17.21
在 traefik 上运行一个 client 模式的 consul 的 agent,加入 consul 的集群
[root@traefik ~]# consul agent -data-dir /opt/consul -node=agent_traefik -bind=172.17.17.21 -join 172.17.17.11 &
然后运行 traefik
[root@traefik ~]# traefik --configFile=/vagrant/config/traefik.toml
配置文件 /vagrant/config/traefik.toml 内容
[global]
  checkNewVersion = true
  sendAnonymousUsage = false

[api]
  insecure = true
  debug = true
  dashboard = true

[log]
  filePath = "/vagrant/logs/traefik.log"
  level = "DEBUG"
#  format = "json"
[accessLog]
  filePath = "/vagrant/logs/access.log"

[entryPoints]
  [entryPoints.web]
    address = ":80"
  [entryPoints.web-secure]
    address = ":443"

#[certificatesResolvers.sample.acme]
#  email = ""
#  storage = "acme.json"
#  [certificatesResolvers.sample.acme.httpChallenge]
#    entryPoint = "web"
#  caServer = "https://acme-staging-v02.api.letsencrypt.org/directory"
#  [certificatesResolvers.sample.acme.tlsChallenge]

[providers]
  [providers.consulCatalog]
    exposedByDefault = false
    refreshInterval = "5s"
  [providers.file]
    filename = "/vagrant/config/static.toml"
    watch = true
配置文件 /vagrant/config/static.toml
# 强制所有 http 请求转 https
#[http.routers.http-catchall]
#  rule = "hostregexp(`{host:.+}`)"
#  entrypoints = ["web"]
#  service = "api@internal"
#  middlewares = ["toHttps"]

# https 路由
#[http.routers.my-api]
#  rule = "Host(`traefik.haozy.com`)"
#  service = "api@internal"
#  middlewares = ["auth"]
#  [http.routers.my-api.tls]
#    certResolver = "sample"
#    [[http.routers.my-api.tls.domains]]
#      main = "traefik.haozy.com"

#[http.middlewares.toHttps.redirectScheme]
#    scheme = "https"

# http 路由
[http.routers.my-api-http]
  rule = "Host(`traefik.haozy.com`)"
  entrypoints = ["web"]
  service = "api@internal"
  middlewares = ["auth"]

[http.middlewares.auth.basicAuth]
  # 密码生成 echo $(htpasswd -nb haozy 123456)
  users = [
    "haozy:$$apr1$$pfkpgu.w$$jHQtt8T96PdvyojTBgh5E/",
  ]
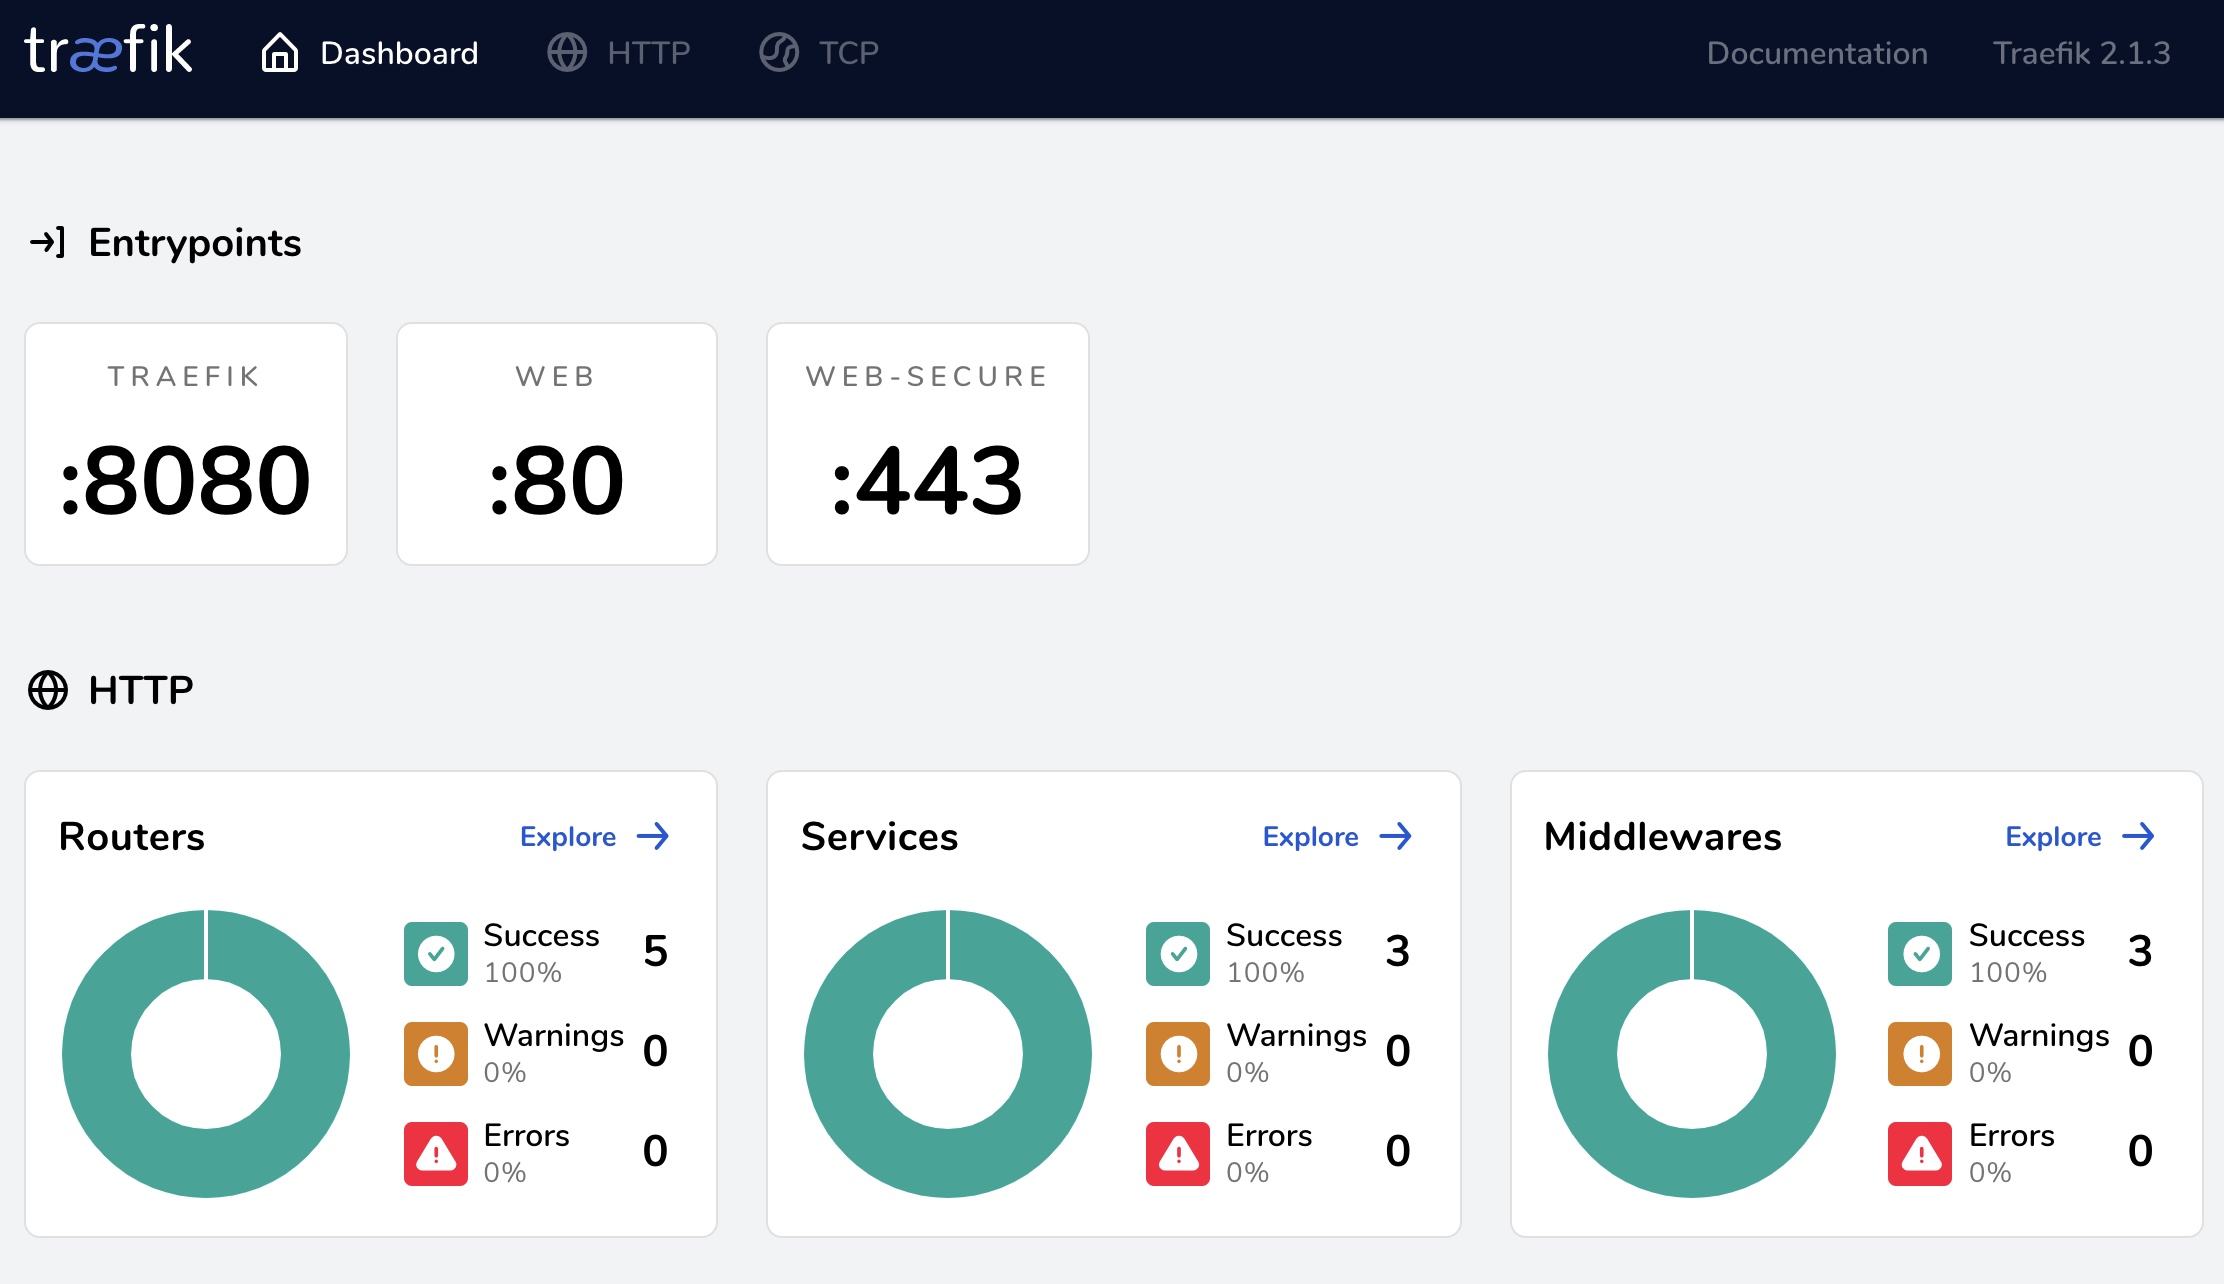
将域名 traefik.haozy.com host 指到 172.17.17.21 ,访问 traefik.haozy.com 因为配了 auth 验证,输入用户名密码后就可以看到管理界面了。https 也很简单,因为本地测试先注释了对应的配置。
现在将 node1、node2、node3 节点上注册的 web 服务删除,在 web.json 中增加 traefik 相关的 tag,再重新注册。
web.json
{
  "ID": "web",
  "Name": "consul_web",
  "Tags": [
    "whoami",
    "traefik.enable=true",
    "traefik.http.routers.consul_web.rule=Host(`web.haozy.com`)",
    "traefik.http.routers.consul_web.entrypoints=web",
    "traefik.http.services.consul_web.loadbalancer.passhostheader=true"
  ],
  "Check": {
    "Args": ["curl", "172.17.17.11:32768"],
    "Interval": "10s",
    "Timeout": "3s"
  },
  "Address": "172.17.17.11",
  "Port": 32768
}
[root@node1 ~]# curl --request PUT http://127.0.0.1:8500/v1/agent/service/deregister/web
[root@node1 ~]# curl --request PUT --data @web.json http://127.0.0.1:8500/v1/agent/service/register?replace-existing-checks=true
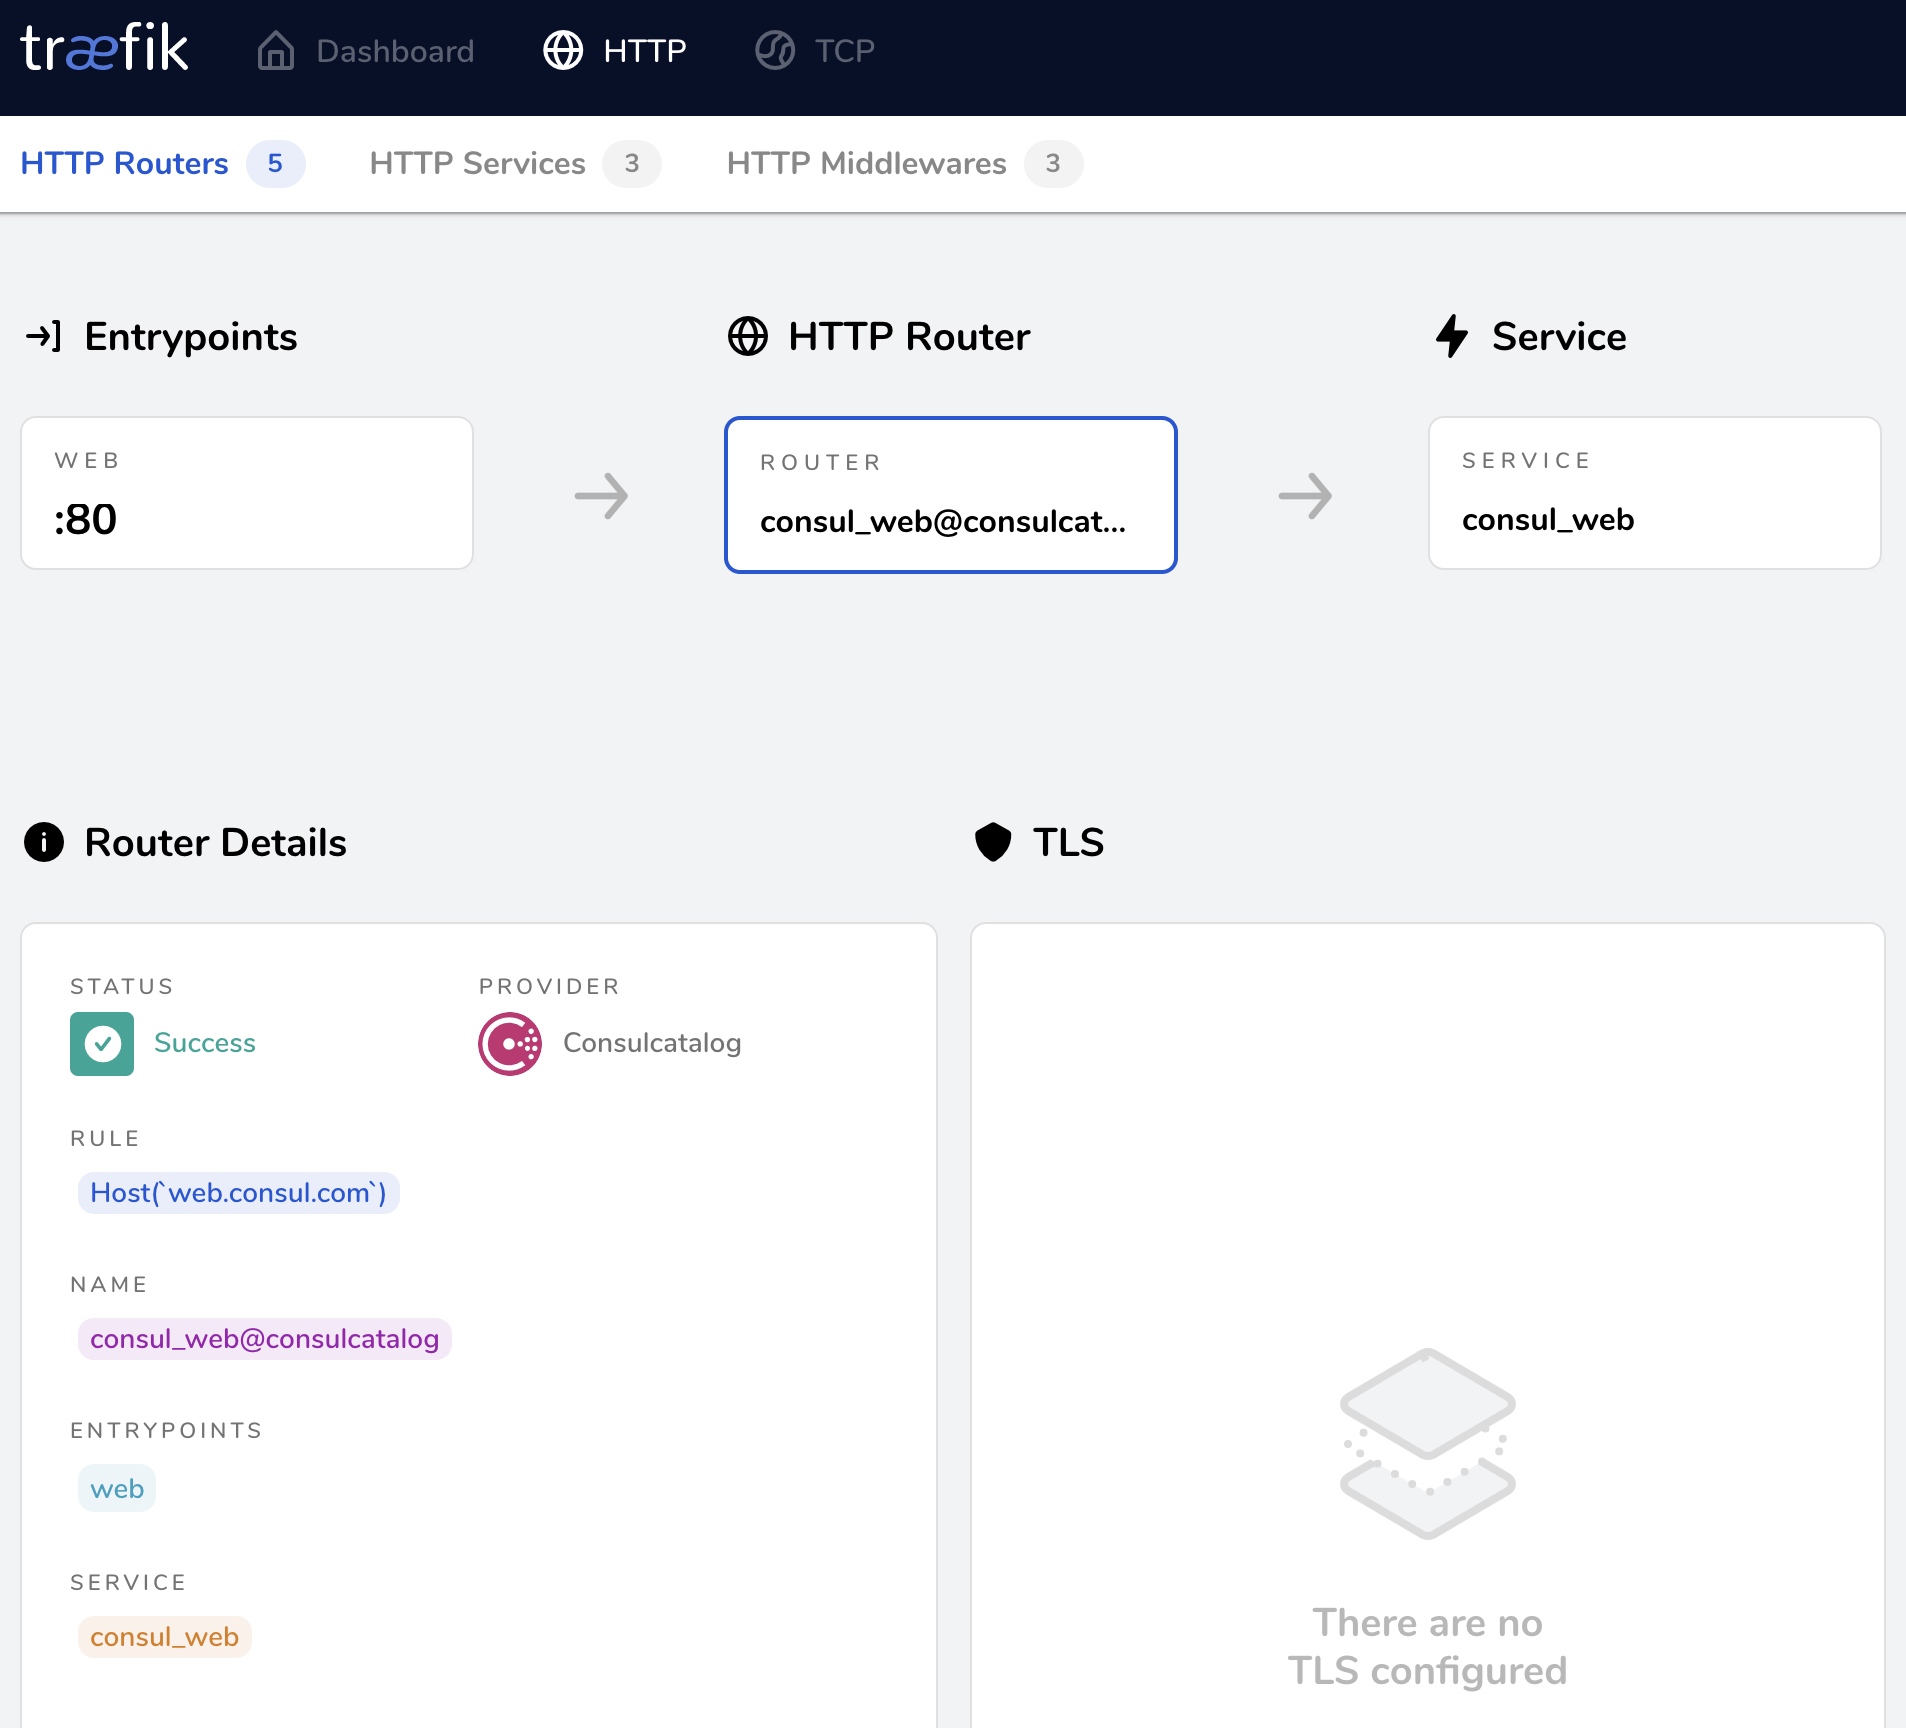
现在通过 traefik 管理界面可以看到 web.consul.com 的路由信息,以及对应的后端服务。
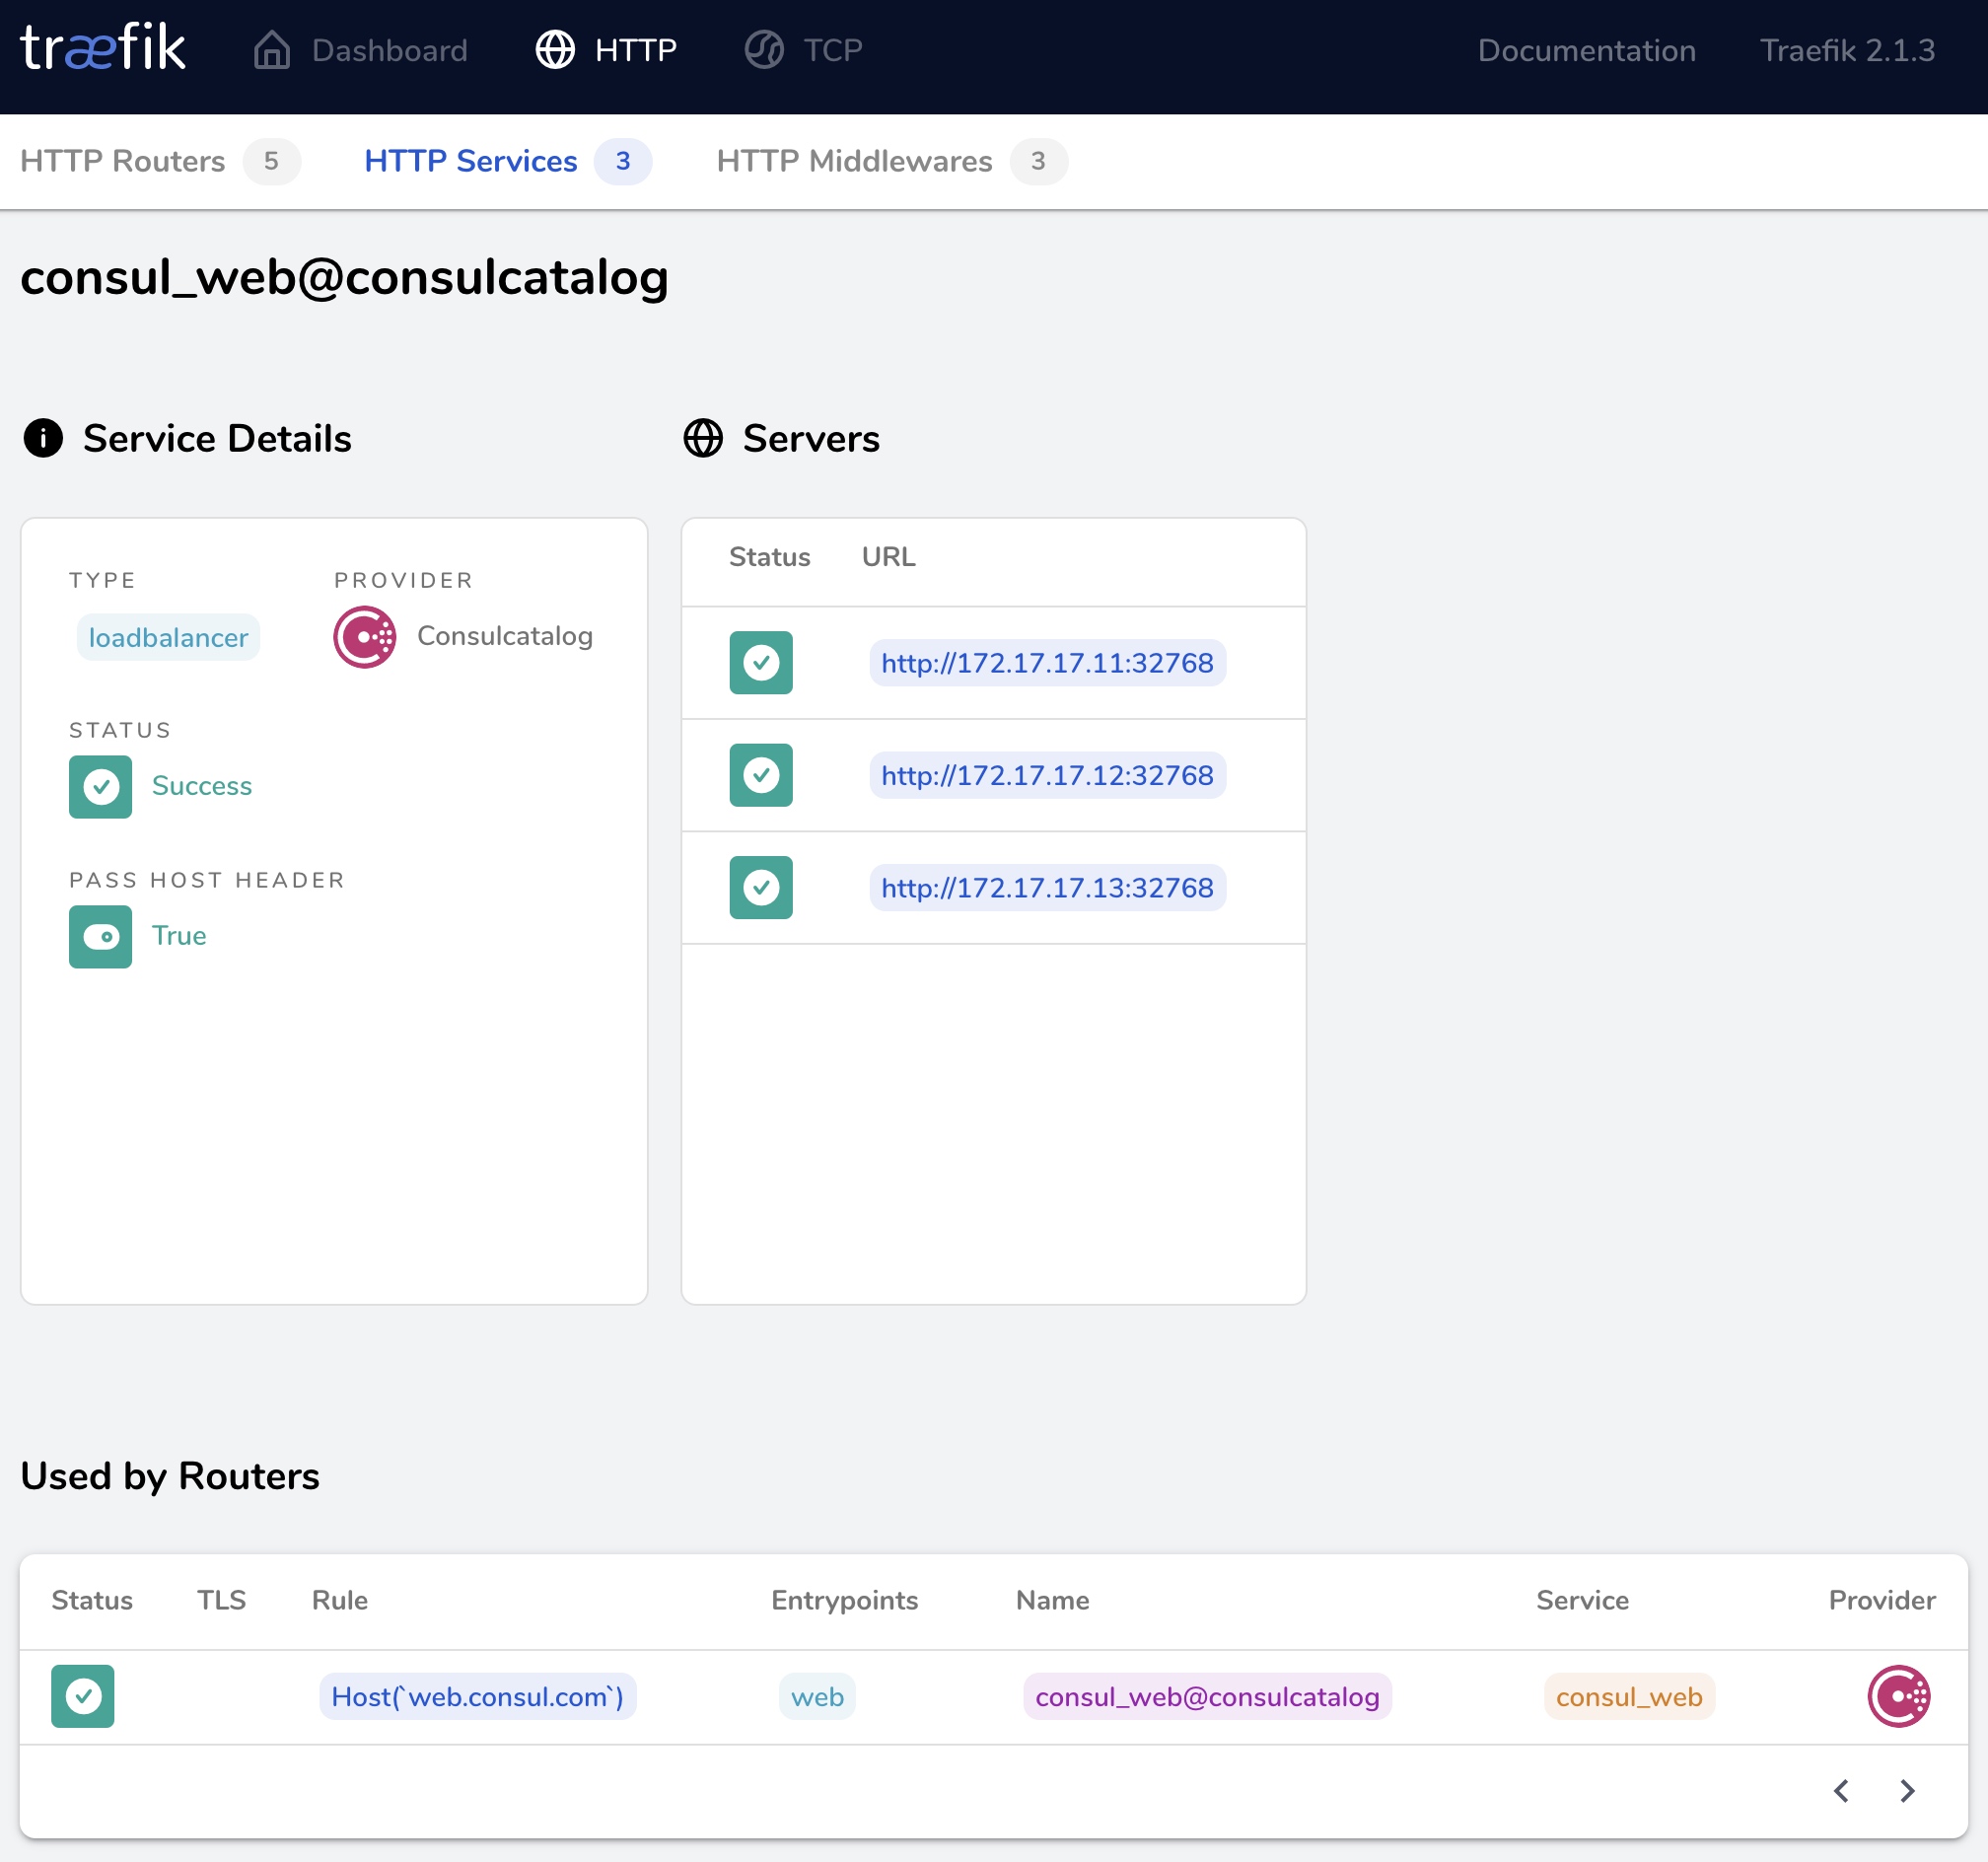
将域名 web.haozy.com 指向 172.17.17.21,请求会轮训请求所有后端服务。至此外部流量的负载均衡与路由就完成了,当然 traefik 中的 Routers 和 Middlewares 还可以实现很多复杂的处理。
再多说一点,traefik 2.0 开始分成静态配置文件和动态配置,在静态文件中配置的 Routers、Middlewares 之类的是可以在动态配置中调用的,省去了很多定义,比如调用静态配置文件中的 auth。
traefik.http.routers.consul_web.middlewares=auth@file